Tampilkan postingan dengan label Pork. Tampilkan semua postingan

Kamis, 18 Agustus 2016

Paper Pork Shoulder – It’s a Wrap

This “paper pork” was inspired by a technique for smoking beef brisket that involves wrapping the meat in parchment paper after a certain point in the cooking process, in an effort to keep the meat moist, and succulent. Turns out it works great for pork shoulder.

I decided to try it for an oven-roasted pork shoulder, wrapping it from the beginning, and it came out so perfectly tender, and juicy, I’ve been doing it that way ever since. Like I said in video, I’m not exactly sure how much better this comes out with the paper, verses just wrapping tightly in foil, but it seems to stay moister, and more importantly, it looks cool on the table.

We don’t get any kind of crust using this method, but it doesn’t lack for flavor, and if you’re going to use this for pulled pork sandwiches, along with your favorite bbq sauce, I don’t see how that’s going to be any kind of a problem.

Speaking of barbecue sauce, I’m going to show you an unusual one next week, so stay tuned for that. In the meantime, I really hope you give this paper pork a try soon. Enjoy!


Ingredients:
7 pound bone-in pork shoulder roast
for the rub:
2 tablespoons kosher salt
1 tablespoon freshly ground black pepper
1 tbsp smoked paprika
2 teaspoons onion powder
1 teaspoon garlic powder
1 tablespoon brown sugar
1 teaspoon cayenne
- Wrap and roast at 225 F. for 1.75 hours per pound

Jumat, 12 Agustus 2016

Baking Bacon for the Perfect BLT

If I had a dollar for every request I've received for a BLT video, I'd have enough money to buy a lot of bacon. I’ve never gotten around to doing one, mostly because do you really need a video to make a BLT? 

However, I have wanted to show this little trick for making bacon by baking; and it gave me the perfect opportunity to show off my vision of what the perfect bacon, lettuce, and tomato sandwich looks like.

I recommend using heavy-duty foil for this, as it’s a little easier to work with, but regular foil will do the job. Like I said in the video, as long as you create some kind of valleys for the fat to flow into, the technique will work as shown. The result is perfectly flat, perfectly crisp, yet still succulent strips.

Your cooking time is going to vary depending on how thick the bacon is, so I’d start peeking at about 15-20 minutes, and go from there. You can crowd the bacon more that I did, and it’s okay if it’s very slightly overlapping, since it will shrink as it cooks. Just check after about 10-15 minutes, and re-space the pieces if needed. I really hope you give this great bacon technique a try soon. Enjoy!


Bake bacon at 375 F. for 25-30 minutes, or until you reach your desired level of doneness.

Jumat, 10 Juni 2016

Bacon & Asparagus Dutch Baby, Baby!

I’ve been seeing savory, non-breakfast versions of Dutch Babies pop up on menus lately, and while I’m not sure that means it’s a hot new trend, I figured I would get in on the ground floor with this amazing bacon and asparagus version, just in case.

Above and beyond the ingredients, the most important thing here is using a cast iron pan similar to, or better yet, exactly like, the 12-inch example seen herein. These relatively cheap and indestructible pans are one of the best kitchen investments of all time, but if you don’t have one, there is a Plan B.

You’ll have to do the bacon and asparagus steps in a frying pan, and then transfer everything to a similarly sized casserole dish. Make sure the sides are coated with your bacon fat, and then pour in your batter, and bake as shown.

It will take a few extra minutes in the oven, but just simply bake it until it’s browned, and properly puffed. It won’t work as well, but you should get similar results. Either way, I really hope you give this wonderful bacon and asparagus Dutch Baby a try soon. Enjoy!


Ingredients for 2 large or 4 small portions:
3 large eggs
2/3 cup milk
3/4 teaspoon kosher salt
1/2 cup finely grated Parmigiano-Reggiano (1/4 cup if packed, but don’t pack it)
freshly ground black pepper and cayenne to taste
1 tsp lemon zest
1/2 cup all-purpose flour *packed 
*push and pack as much flour as you can fit into the 1/2 cup measure)
1 tbsp olive oil
6 strips bacon
1 generous cup sliced fresh asparagus

- Bake at 475 F for about 12-13 minutes, or until browned and puffed

Jumat, 27 Mei 2016

Yucatan-Style Grilled Pork – Surrounded on Three Sides by Flavor

If the early feedback from the YouTube channel is any indication, this may not actually be “Yucatan-style,” and I couldn’t be less surprised.  I did no real research into the traditional foods of the Yucatan peninsula, and based the name of this dish solely on a pork chop I once enjoyed at a sports bar.

They called it “Yucatan-style,” and it featured vibrant citrus/chile flavors, as well as a beautiful orange hue, which I figured out was from ground annatto. This is the signature ingredient in the famous braised pork dish, cochonita pibil, and can be found at any Latin market, or your larger, fancier grocery stores.

As I mention in the video, I think this easy marinade would work on all kinds of pork cuts, but the tenderloin is very user-friendly, and it’s mild flavor really takes to these ingredients. I think 4 to 6 hours is plenty of time to marinade the meat, but I’m guessing that overnight would probably be fine as well.

Once grilled, you have so many options for enjoying these. Sandwiches, salads, and tacos are all wonderful choices, and I’ve also heard from a reliable source that diced, they make for an epic pan of nachos. This weekend is the official start of summer grilling season, and what better way to kick it off than this tasty, possibly Yucatanian treat? I really hope you give this a try soon. Enjoy!


Ingredients for 4 to 6 portions:
2 whole pork tenderloin, trimmed
2 oranges
2 or 3 lemons
2 or 3 limes
6 cloves minced garlic
1 rounded teaspoon annatto powder, plus more to sprinkle on before grilling
1 teaspoon chipotle powder
1 teaspoon ground cumin
1/2 teaspoon cayenne
1/2 teaspoon dried oregano
1/2 teaspoon freshly ground black pepper
1 tablespoon kosher salt
1 tablespoon vegetable oil before grilling

- I garnished with cilantro, and pickled onions. To make your own, thinly slice some red onions, and cover them with red or white wine vinegar. Leave to soak for 4 hours or overnight, and that's it

Selasa, 26 April 2016

Perfect “Dry-Brined” Pork Chops – Come for the Oxymoron, Stay for the Juicy Meat

I’ve wanted to do a video on “dry-brining” for a while now, and was reminded of that fact after recently seeing a friend’s blog post on the subject. That friend would be the lovely and talented, Jennifer Yu, who publishes the blog, Use Real Butter.

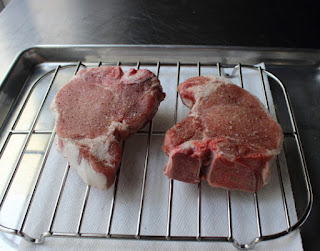
Seeing those juicy pork chops in her post inspired this video, which features one of my favorite getting-meat-ready-for-the-grill techniques of all time. If you can call sprinkling salt on pork chops, a “technique,” and for the purposes of this post, we will. 

By the way, if this looks familiar, it should. We’ve used this trick before in previous videos, but just never called it “dry-brining,” mostly because that’s not a thing. By definition, a “brine” is a liquid, but since this contains the same active ingredients, and has the same effect, we don’t let a minor detail like no water get in our way.

I could go into a long, scientific explanation of what exactly happens here, but instead I’ll provide a link to this great article on Serious Eats, by J. Kenji López-Alt. Jen used his cookbook, The Food Lab, as a guide, and so we’ll send you his way for all the pertinent details.

While our friend Kenji will do a much better job explaining the science behind this magical method, I think I did a decent job in the video explaining how wonderfully this works. As long as you don’t horribly overcook your meat, this “dry-brine” technique will produce the juiciest, and most flavorful pork chops you’ve ever had.

So, a big thank you to Jennifer for inspiring us, as well as to Kenji for inspiring her. With peak grilling season right around the corner, I really do hope you give this amazingly simple trick a try soon. Enjoy!


Ingredients for 4 large pork chops:
2 tablespoons kosher salt
1 teaspoon freshly ground black pepper
1/4 teaspoon cayenne pepper
- Mix and apply generously to both sides of the chops. Let “brine” uncovered in the fridge for 18-24 hours. Some say you can do this in less time, but I’ve always let it go at least overnight.